I TE TAU TUATORU
TE WHAKAAKO I TE TUHI Ā-RINGA
I te tau tuatoru: Te Raupapa Whakaako Pū
In the first three years of kura, ākonga have been learning to correctly form first the lowercase letters, followed by the capital letters in this sequence:
Ngā pūriki
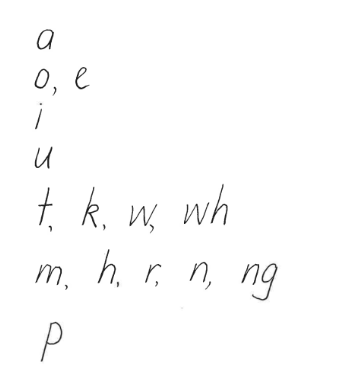
Ngā pūmatua
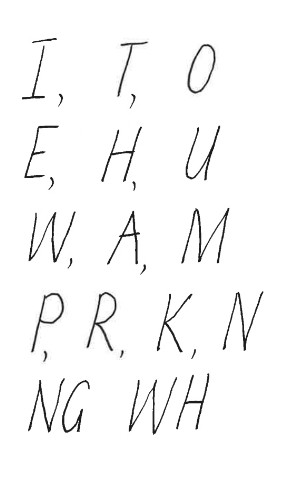
Note: The lowercase and uppercase o, O, should be formed as an oval.
They have also been learning to form numerals in separate lessons.

Numerals
Cursive does not apply to numerals. Check that ākonga can form the numerals 0 to 9 correctly - if not, focus instruction on these numerals in isolation before moving to getting them to practice combinations of two-digit and three digit numbers, Practising numbers in patterns can also support their learning in pāngarau e.g. 5, 10, 15, 20 etc.
I te tau tuatoru: Te Tuhi Rere (Cursive Writing)
The primary objective in years 3 (and 4) is to start teaching ākonga cursive writing (te tuhi rere) where ligatures are added to some letters. This depends, of course, on readiness. Some ākonga may be capable of joining letters in year 3; others may not achieve this skill until years 7 and 8.
“Cursive” (te tuhi rere) is a term that usually refers to handwriting in which the letters within words are connected by ligatures or joining strokes to increase the speed of writing. Ākonga will also need to add slope to their letter and numeral formation.
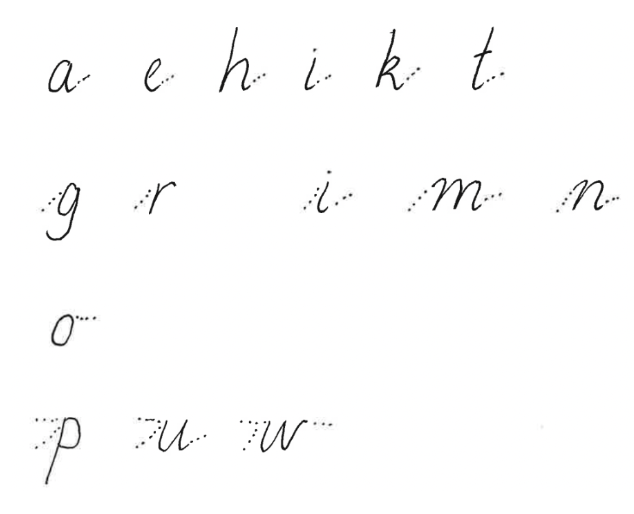
Although some ākonga may begin to link letters independently, it is desirable to teach them how to join letters to one another, for such joins or ligatures (rere hono) are the basis on which fluency and speed are built.
Note: When cursive writing, add the macrons once the word is completed to keep the writing fluent.
I te tau tuatoru: Te Rere Hono (Ligatures)
Ākonga should join only those letters that can be connected readily in rhythmical units. This permits them to reposition their hand and arm, and provides a momentary rest for the hand and fingers.
Ligatures are either horizontal or diagonal, and ākonga need to be systematically instructed in their use. Ligatures are taught by joining together groups of two or three letters. It is neither necessary nor desirable to go through an interim stage between basic and cursive when “ticks” are added to individual letters.
First, teach the letters that naturally join with diagonal ligatures.
Diagonal ligatures happen naturally from the following letters;

Examples

Diagonal ligatures are made naturally to the following letters;

Examples

Horizontal ligatures; Next, teach those letters which join with horizontal ligatures
For example
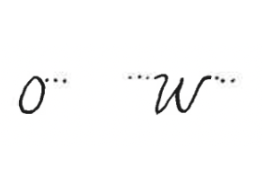
Basic script letters o, and w join horizontally to letters not starting with ascenders.
Horizontal ligatures are also not made to basic script letter e.
For example

At a later stage, it is helpful if ākonga practice groups of three or four letters, which are joined.
For example
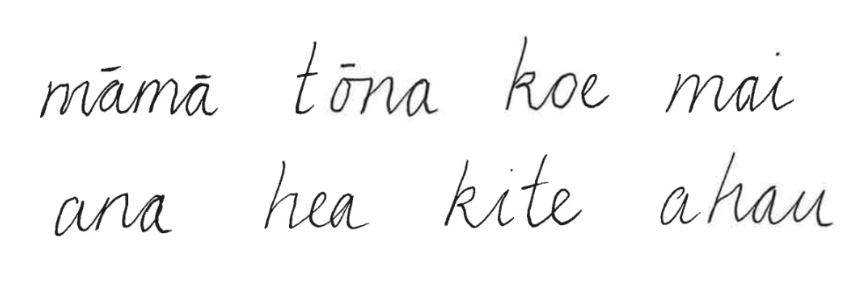
These steps provide for a functional handwriting style, owing to the absence of looped letters and, more importantly, allowing for “rests” where letters do not join naturally.
The hand is lifted and moved along the page and the muscles have an opportunity to relax momentarily. Such rests occur after the letter (p) and may occur after basic script (i) to permit the dot to be made immediately.
Variations can be expected to show the beginning of an individual style.
I te tau tuatoru: Te Whakaako i te Tuhi ā-Ringa
1) Model the cursive form of the letter or letters reinforcing the correct form and guidelines about the use of ligatures. Remember that cursive does not apply to numerals.
Visual aids to support correct formation are also a good idea.
2) The ākonga would all then practise writing the letters and numerals in their handwriting books,
3) Walk around the room giving feedback and guidance as the ākonga practice.
I te tau tuatoru: Te Aromatawai i te Tuhi ā-Ringa
MAHI AROMATAWAI: What to look/listen for, ākonga are:
Letter and Numeral Formation
Consistency:
Look for consistent slant, size, and spacing of letters and numerals.
Ensure uniformity in letter and numeral height and width.
Accuracy:
Check that each letter and numeral is formed correctly and clearly.
Verify the correct starting and ending points for each letter and numeral.
Connections:
Ensure smooth and correct connections between letters.
Look for continuous strokes without lifting the pen/pencil unnecessarily.
Legibility:
Ensure that the writing is easy to read.
Look for distinct and recognisable letters and numerals.
Writing Fluency
Speed
Observe the speed of writing to ensure it is neither too slow nor too rushed.
Aim for a balanced pace that maintains legibility.
Flow:
Ensure a natural and fluid movement when writing.
Check for continuous, unbroken lines in words and sentences.
Spatial Awareness
Spacing:
Check the spacing between letters and words to ensure it is even and appropriate.
Avoid crowded or overly spaced writing.
Alignment:
Ensure writing is aligned with the lines on the paper.
Check for consistent alignment of letters on the line and that p is correctly positioned with the descender written below the line.